Friday, 14 September 2012

Garage Sale Shelf

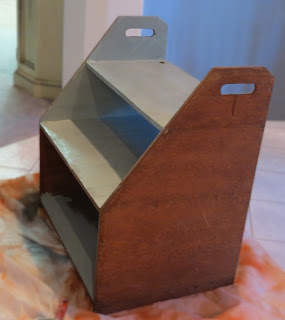
I picked up this rough looking shelf at a garage sale for only 5 bucks. I wasn't sure if I wanted it to be a book shelf or a shoe rack...the possibilities are endless.

I took a mid painting picture to show the before colour...
I started painting then remembered to take a picture.
I put duck egg blue and french linen Annie Sloan Paint together and painted it all. Then I decided to put a little transfer of a kings crown on the side. I decided I needed a book shelf for all my favorite books in my tv room. I love to sit on my little love seat and curl up with one of my devotional books.


The transfer crown was taken off the web site The Graphic Fairy http://www.graphicsfairy-diy.com/2012/09/transfer-printable-crown-silhoutte.html. It is the Antique Crown. All I did was print off the image then put the ink part down and tape it to the shelf, then I took a water spray bottle and got it damp, then I rubbed the paper with my finger until the ink transferred onto the chalk paint, then I took a think paint brush and I painted the image onto the wood and then I sanded it down to make it look like it has been there for years.

I hope you like it.

Saturday, 1 September 2012

Bed Side Table reborn

I have had this bed side table in my family for as long as I have been alive (over 30 years now) and it has always looked like this. I keep it for memories that it carries but I was tired of the look of it.

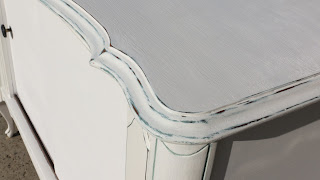
I so dearly love Annie Sloan paint because I can add as many layers of colours on it as I please. I went with white, duck egg blue and then a final coat of french linen.  I painted the inside the french linen so it is a beautiful grey when I open the cupboards.

This is how it turned out.

Wednesday, 29 August 2012

1880's Chair transformation

I got this great farm chair that is from the 1880's off kijiji a few weeks ago. I loved the petina in it but I wanted to make it fit my guest room which is a total shabby chic feel to it.

I wanted to make it more a country grey look and distress it completely to bring back a lot of the dark wood grains. Here is the result....The only thing I need to do is to put some dark wax on it to make it really pop but I have my can at a friends house so I need to wait a bit.


You can see all the design popping through the grey. I love this and once the dark wax is put on...boy it will look amazing.


Monday, 27 August 2012

Round Table

I was garage sale looking AGAIN, it never seems to stop in the summer months for me. A $5 bill later and I was driving home with this little gem.


The top was really rough, so I did sand it down a bit with my hand held electric sander to smooth out the chips in the paint. I had just bought a new can of Annie Sloan Paint in French Linen and pure white and thought that a french feel to this piece would be appropriate.

This is how it turned out. It took a bit of work to get the lines to be straight. A small artistic brush works perfect...lots of little touch ups were needed so this table took me a bit longer than I normally spend on one but I love the end result.


Thursday, 16 August 2012

A shabby chic hutch

So this is my latest transformation.
I got it at a garage sale for a mere 15 bucks. I loved the look of it and what I could make it.
Isn't she cute...just needs a bit of TLC

Well I got to thinking when I got her, what does she want to look like. I wasn't too sure at first if I should mod her up but then I thought - nope she is chic. So I decided to do a Nate Berkus and paint the inside a different colour to make it pop. Here is the end result.


Tuesday, 7 August 2012

Toy box and foot stool.

 I had this old toy box for about 8 years. I has gone from my oldest son all the way down to my 3 year old. The paint was very red and was getting a bit worn.

So I decided it was time for a face lift. Plus I had picked up this little gem of a stepping stool at a garage sale 2 weekends ago and thought it would make a cute pair.


I got to painting them with Annie Sloan Duck Egg blue (since I have so much paint left over still)....and  this is how they turned out. I also found an old book of Bambi that I have had since I was a baby and it is torn and starting to fall apart. I cut out the cutest pictures and mod podged them on the box and stool

here is how it turned out. I think it looks like it has been in a farm house since the 1950's..so cute and tuns of charm.


Friday, 3 August 2012

My Side Table Find


I found this great table at a garage sale...I immediately fell in love with it. Another lady was eyeing it and I told her I do DIY's and told her what I would make it out of. She was so impressed that she gave it over to me to buy. 20 bucks later and I was driving home with this gem.


It is so dark that you can't even tell that there is great lines and detail to this piece that are a show stopper.

I took out my Annie Sloan paint and did a first coat of blue on it then painted over it with a pure white.


I sanded it down to bring out the blue and wood grains and to make it pop. I love how it turned out.
Please let me know what you think.


you can see the duck egg blue popping thru...gorgeous.


Mirror Mirror On the Wall


So I got this mirror at Good Will a few months back when I first started doing my DIY'ing and I loved the look of the old white but as I am getting better at my distressing, I wanted to make my mirror look more in place with my antique dinning room...so I put Duck Egg blue on it and distressed it. I still have to put the dark wax on but my girl friend Natalie "who I am doing the table & chairs for" has it so I will re-update this blog when I am fully done the mirror and give you a final peek at it. The dark wax will really bring this mirror from nice to oh la la.

So this is a picture of it distressed. I am pretty happy. I also painted my candle holders to match  the color too...it was a fun project for my sons to help me with for an hour (no fighting and it was quiet YEAH).


Thursday, 2 August 2012

Old lawn chairs look new again

I have had these lawn chairs for around 10 years now and I was bugging my husband all summer to buy me a patio set ( I sit outside to watch the kids play but don't really use the patio as much as I want to)...so my hubby says "not right now" -translation "when pigs fly".
10 old faded green lawn chairs...I disliked even looking at them.
Walmart was having a great sale on spray paint so I picked out the funnest and boldest colours that I saw "Mandarine"  I also picked up white. So I have the green chairs a bright fun colour and the white chairs got a refreshing coat to bring them back to look nice again.


My next thing is to find some metal side tables "garage & yard sale hunting here I come". and I will transform my patio for the end of summer days and enjoy every moment I can outside while our canadian weather allows me too.

I hope you enjoy reading my blogs, if you do please subscribe as I am always doing something fun and new. I have lots of projects stored up to keep me busy all fall and winter long.

Wednesday, 1 August 2012

Side Table Transformations


I got these two tables *with glass tops* at a garage sale...I wasn't sure what to do with them but I had left over wall paper from my coffee table set and thought it would be really cute with those.

So I took some spray paint and painted the tables black. After letting them dry I had my 6 year old son help me and got to mod podging the top. They turned out super cute.

I love making something that looks a bit blah and turning it into something someone will say "hey where did you buy that" and seeing their face when you tell them you made it.

Be crafty and think outside the box and show me what you have created. If I get a lot of submissions I will create my own feature page of your stuff.

Thursday, 26 July 2012

Working on a Table & Chairs for a friend


One day I was at my girl friends house having a coffee and she had informed me that she was going to look to buy a new table & chairs in black as her set was so scuffed up and looking old...and I said "why buy a new table, why not just paint this"...and I offered to help her as she has never painted anything like this before. My friend Natalie had this kitchen table and chairs. We bought Annie Sloan paint in "Graphyte" which is more a charcoal colour than black. Hoping that the dark wax will make it darker we started painting the chairs.


There are 6 chairs in total.
I really hope she likes it. We had a bunch of little helpers today too, her daughters helped us today as well. It was a family affair which made it very special because as they sit around the table they will always remember that they helped mommy restore their table.


So we painted the tables and chairs and they were coming out great but Natalie was wishing it was not so grey but more black so I ran right down to Walmart and bought some acrylic black paint and made a new mix on the fly and this is what it went from grey to black.

This is the graphyte color. 
Graphyte color - a bit of a duller grey than what Natalie wanted.


So we added some black and this is the result...the last thing to do will be add the dark wax and we will be all done.

I will post the end result next week as we still have a bit more work to do on the wax but I am glad she is happy with how it is turning out.

I am very impressed with the annie sloan paint and that I was successfully able to mix in an acrylic paint and it worked out great. This paint is the easiest paint to use. I love it.

So we got the dark wax on the table today, the chairs still have to get their coat but it was fun distressing everything. Can't wait to take the final end picture to show you all. Loving the wax on the table and how rich and deep it is coming out like. It has a new life, a new personality.

Perfect example of an older table that is in perfect condition, great wood but was a bit worn and now it has a great new updated look.

Wednesday, 25 July 2012

Fun times to be had by all....

Things I have found that will make creating much more fun.


My first discovery with painting was

Yes Mod Podge....this stuff is AWESOME

Big tip - make sure you invest in a wall paper applier. It is a flat tool that you use to smooth out wallpaper. This tool saved me so much time and help smooth out the bubbles that form.

A good idea is let the glue get a bit tacky before you lay down your paper, it will stick better and slowly put the paper down using the tool to help smooth it as it goes down. - If it is a flat surface, put a book or something heavy on top for a good hour or two to weigh it down, this will help keep the bubbles from forming.


My next discovery is.... Annie Sloan Chalk Paint & wax

I can't wait to get started on my next project and use this stuff. The reviews on the paint are beyond awesome so I am expecting great results on using it. I will keep you posted on what I think.
There is only one store in all of Edmonton that carries this paint www.appleboxboutique.ca
So if you are from Edmonton or surrounding area check this small quaint place out.

With this paint all you need is 1 to 2 coats max. the coverage is suppose to be smooth and goes on thick...you can actually thin this paint out with plain old water, you can mix different annie sloan paints together to get a new colour and it is suppose to not be murky but be crisp.
The paint is a bit expensive @ 51.95 a can of paint, if you want to make any sort of profit on your items..you must choose carefully on what you are wanting to paint with this. A 20.00 piece of chipped or broken furniture that you can only sell for 20.00 or less is not going to cut it, but a 5 dollar old school desk that is in perfect condition will yield a good profit and you will have paint left over for another project to sell. 
Friday, 29 June 2012

Like mother like son.


So this is my 8 yr old son and yesterday he was bored on his first day of summer holidays. I told him that he could have this bench that I picked up last weekend at a garage sale for 10 bucks and he could refurbish it.
Well he spent two days sanding this thing down - it is literally as smooth as a babies bottom...he did such a great job at that.

Then today after he washed it down and had his lunch waiting for it to dry he painted it in a grey color (the same paint as my first set of tables) so it can be taken outside or inside because it's exterior paint & primer in one.

It was a great project for him and bench turned out really great.

Friday, 22 June 2012

My awesome find on Kijiji.

Thank you Better After for featuring my creations. I love to take something someone thinks is junk and making it look amazing again...check out my other blog posts to see what else I have done.

I am at it again...it never seems to stop for me.
Well searching on kijiji there was a lady moving and wanted to get rid of of a coffee table and two side tables. It was an amazing deal that I couldn't pass up. It was only 5 bucks for all 3 items. A real steal of a deal. Always keep your eye open for people not really wanting things, they give them away either for free or cheap just to move it, but it is worth much more with a bit of elbow grease.


coffee table.

The tables were very beat up, so I sanded them down in my little hand electric sander, filled in the nicks with wood filler and waited for that to dry. Then gave it another sand down.

I painted the tables completely white and found this great graphic wallpaper at Home Depot that was ripped and out of the wrapper so I took it to customer service and asked if they would sell it to me at a discount - good frugal tip...always look for damaged items. This roll had just a slight tear at the very front of the roll but the rest was perfect....why pay full price when you can get a bargain. I had some mod podge at home so I decided it would be a great bold statement on the tables to take them from blah white to a pop of pizzaz. 


This is the coffee table.

The side tables.
close up of one of the side tables.
Subscribe to my blog to watch the other things I am going to create...it will be fun. Make sure to check out my other diy transformation on this blog.